
This is the third post in DDR4 on Z170 series – for previous parts see part 1 and part 2, where I cover stock and safe settings, respectively. In this part I’m going to use settings which are beyond everyone’s safe range, however in my opinion this is just about max I could use 24/7 in my system with adequate cooling (at least 120mm blowing directly over RAM). This is quite brave, still not extreme though as we’ll see in the next parts. The settings from previous part have been optimized further, which is summarized in the table:
Changes
Let me quickly summarize what changes in the memory settings:
| Memory | Original frequency | Original timings | Voltage | Optimized frequency | Optimized timings | New voltage | OC frequency | OC timings | OC voltage |
| G.Skill TridentZ 3600C17 | 1800 MHz (3600 effective) | 17-18-18-38 2T | 1.35V | 1800 MHz (3600 effective) | 15-15-15-28 1T | 1.4V | 1800 MHz (3600 effective) | 13-13-13-28 1T | 1.55V |
| G.Skill RipjawsV 3200C16 | 1600 MHz (3200 effective) | 16-16-16-36 2T | 1.35V | 1733 MHz (3466 effective) | 15-17-17-28 1T | 1.4V | 1800 MHz (3600 effective) | 13-17-17-28 1T | 1.55V |
| HyperX Savage 2666C13 | 1333 MHz (1666 effective) | 14-15-15-35 2T | 1.35V | 1400 MHz (2800 effective) | 12-14-14-28 1T | 1.4V | 1500 MHz (3000 effective) | 13-15-15-28 1T | 1.5V |
| 1466 MHz (2933 effective) | 13-14-14-28 1T | 1.45V | 1533 MHz (3066 effective) | 12-15-15-28 1T | 1.55V |
 In addition to main timings and frequency change, I also tighten secondary and tertiary timings, so they are quite aggressive. This includes tCWL changed to 9 and – in case of B-die – TRFC to 260.
Test results are:
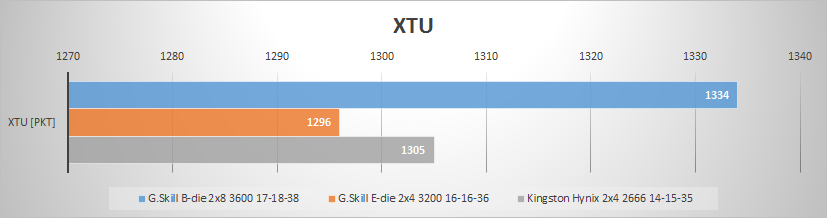
XTU
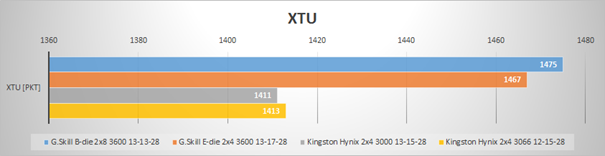
The progress continues in case of Samsung-based mems, both of them gain 15 points by moving from CL15 to CL13. Hynix break 1400 barrier, the less aggressive setting closing on to the tighter one.
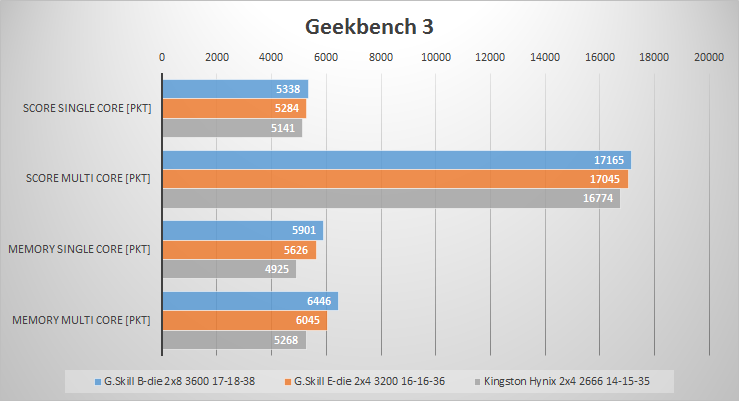
Geekbench
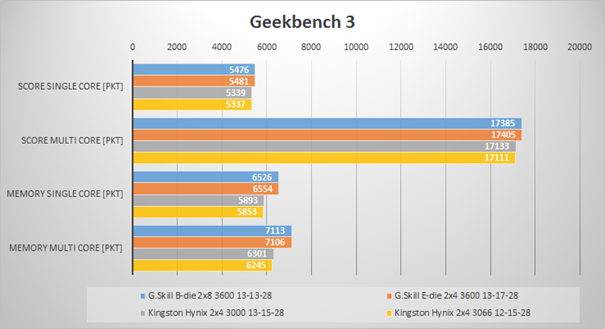
General results in Geekbench 3 are the same with Samsung ahead of Hynix, however 3200 caught up on 3600 despite of advantage of tighter TRCD/TRP on B-die. It is also possible that I experienced bad RTL training on B-die while testing this. In Memory subtests HyperX are now far behind due to too low operating frequency and it is also reflected in the overall score.
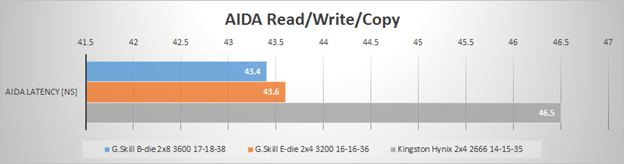
AIDA
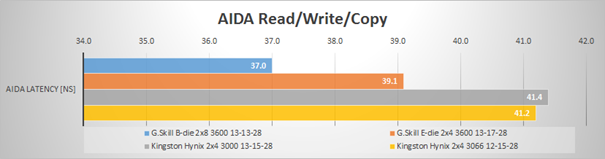
Latency test confirms theoretical improvement, both G.Skill mems improved 2 ns since previous test, while both HyperX gained “only” 1 ns.
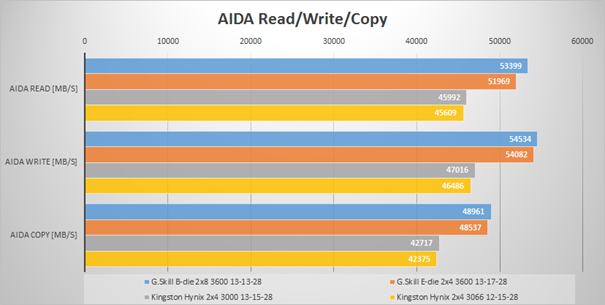
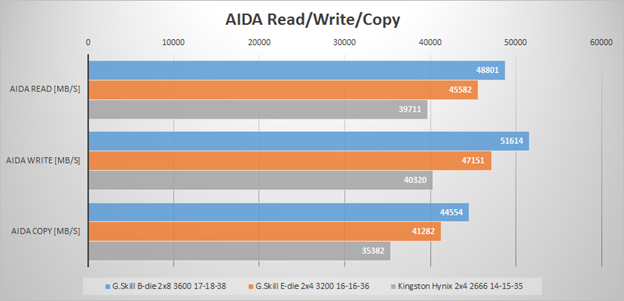
Synthetic bandwidth tests also improve, B-die are almost maxed out so they don’t gain much, E-die almost catch them, while Hynix show significant boost, especially in first (less aggressive) setting – over 4 GB/s in each test.
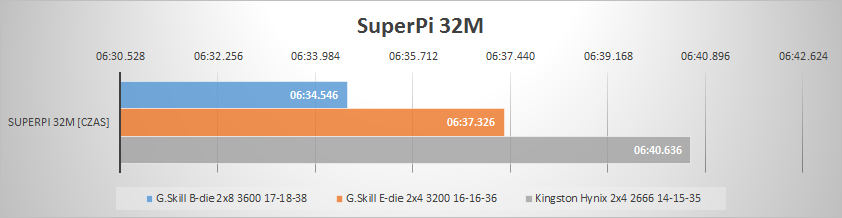
SuperPi 32M
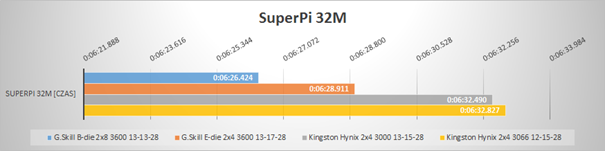
Closing test is SuperPi 32M, where both Samsungs gain additional 3 seconds. Results for both HyperX settings are very similar and they don’t differ much from previous results, which might suggest that we’re reaching performance limit of Hynix MFR on air.
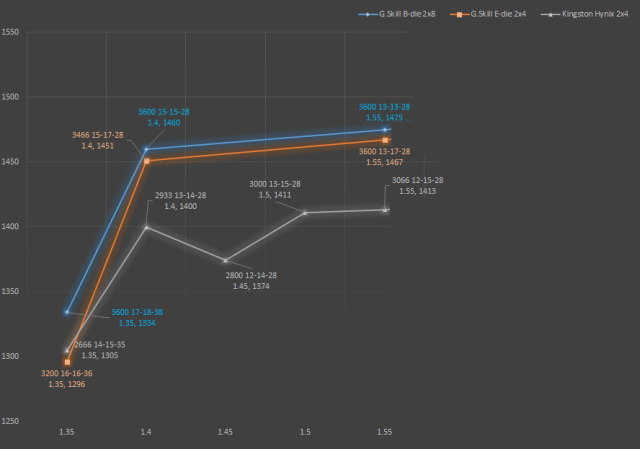
Voltage scaling
Starting from this part, I will show collective results for XTU and 32M as real life benchmarks on one chart to visualize voltage scaling. I went the easy way with charts here by cutting out the part which is not yet described.
XTU
32M
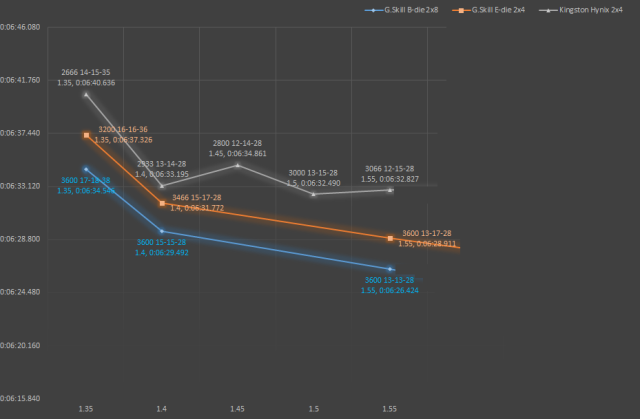
This concludes tests with safe voltage. I was able to demonstrate possible gains in benchmarks, which were visible, but not as impressive when switching from XMP to optimized settings. Next part will include another voltage raise to 1.7V which is definitely beyond safe settings – remember that 1.65V was officially maximum recommended voltage to be used on previous generation of memory (DDR3). It will also be last part, where HyperX will be included as maximum of MFR on air will be reached.